Yoga Sequence for a Perkier Backside: Sculpt Your Glutes
Yoga is a great way to tone and strengthen your body. It is also an excellent way to sculpt your glutes, giving you a perkier backside. In this article, we will explore a yoga sequence that will help you achieve the perfect backside.
Mountain Pose
Begin by standing at the top of your mat with your feet hip-distance apart. Stand tall with your arms at your sides and your shoulders relaxed. This pose is also known as Tadasana, and it is the foundation for all standing poses in yoga. Stay in this pose for five deep breaths.
Warrior I
From Mountain Pose, step your left foot back about three to four feet. Ground the back foot down at a 45-degree angle and turn the left foot in about 15 degrees. Open your hips, arms, and chest towards the long side of your mat. Stay in this pose for five deep breaths before repeating the same on the other side.
Warrior II
From Warrior I pose, rotate your back foot at a 90-degree angle and keep your front foot at a 90-degree angle. Your arms should be parallel to the floor, one reaching forward and one reaching back. Stay in this pose for five deep breaths before repeating on the other side.
Chair
Begin by standing at the top of your mat with your feet hip-width apart. Reach your arms up towards the ceiling and squat down into Chair Pose. Stay in this pose for five deep breaths. Keep your chest lifted and your core engaged.
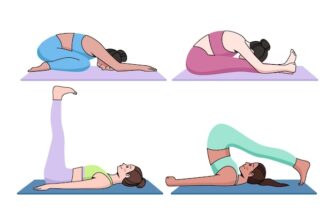
Bridge
Lie down on your back with your knees bent and your feet on the floor. Your arms should be at your sides with your palms facing down. Lift your hips up towards the ceiling and clasp your hands underneath your back. Stay in this pose for five deep breaths.
Locust
Lie on your stomach with your arms at your sides and your forehead on the floor. Lift your arms, legs, and chest up off the floor and reach your arms back towards your feet. Stay in this pose for five deep breaths.
Bow
Lie on your stomach with your legs extended behind you. Reach your arms back and clasp your hands around your ankles. Lift your chest and legs up off the floor and kick your feet into your hands. Stay in this pose for five deep breaths.
Downward Dog Split
Begin in Downward Dog pose, then lift your right leg up towards the ceiling. Keep your left foot grounded on the floor and your right hip stacked on top of your left. Stay in this pose for five deep breaths before repeating on the other side.
Three-Legged Dog
From Downward Dog Split pose, bring your right leg forward and up into Three-Legged Dog pose. Keep your left foot grounded on the floor and your right hip stacked on top of your left. Stay in this pose for five deep breaths before repeating on the other side.
Crescent Lunge
Begin in a low lunge position with your right foot forward. Lift your torso up and bring your arms up overhead. Stay in this pose for five deep breaths before repeating on the other side.
Fire Hydrant
Come down onto your hands and knees. Lift your right leg out to the side and up towards the ceiling, then lower it back down. Repeat this movement for 10 reps before switching to your left leg.
Child’s Pose
Finish your practice with a calming Child’s Pose. Sit back on your heels with your arms extended in front of you and your forehead on the floor. Breathe deeply and stay in this pose for five to ten deep breaths.
FAQs
1. How often should I do this yoga sequence?
You can do this yoga sequence as often as you like. Aim to incorporate it into your workout routine two to three times per week for best results.
2. Can I do this sequence if I am a beginner?
Yes, this sequence is suitable for all levels of yoga practitioners. However, if you are brand new to yoga, it may be helpful to take a few beginner classes first to familiarize yourself with the poses and proper alignment.
3. How long does it take to see results from this yoga sequence?
The amount of time it takes to see results varies from person to person. Consistency is key, so keep up with your practice, eat a healthy diet, and stay active outside of yoga as well.
4. Do I need any props for this sequence?
You do not need any props for this sequence, but you may want to have a yoga block on hand for some of the poses if you have tight hips or hamstrings.
5. Can I do this sequence while pregnant?
If you are pregnant, it is essential to speak with your healthcare provider before beginning any exercise program. Some of the poses in this sequence may not be suitable for pregnant women.
6. Can I modify any of the poses if I have an injury or limited mobility?
Yes, you can modify any of the poses to suit your needs. Talk to your yoga instructor or healthcare provider for guidance on modifications.
7. Is it necessary to do this entire sequence, or can I pick and choose the poses I want to do?
You can pick and choose the poses that work best for you. However, doing the full sequence regularly will provide the most overall benefits to your glutes and the rest of your body.
8. Can I do this sequence after a workout or on its own?
You can do this sequence after a workout or on its own. It is a great way to warm up the body before a workout or to stretch and cool down afterward.
9. How long do I hold each pose?
Hold each pose for five deep breaths before moving on to the next pose. If you want to challenge yourself, hold each pose for up to ten breaths.
10. Can I listen to music while doing this sequence?
Yes, listening to calming music can enhance your yoga practice and help you stay focused and relaxed.
Conclusion
Yoga is an excellent way to sculpt and tone your glutes, giving you a perkier backside. This yoga sequence provides a balanced workout for your glutes and the rest of your body. Remember to breathe deeply, work at your own pace, and modify as necessary. With consistency and dedication, you will see the results you desire.